
- Submit a Protocol
- Receive Our Alerts
- EN

- Protocols

- Articles and Issues
- For Authors
- About
- Become a Reviewer

test

Published: Vol 11, Iss 18, Dec 20, 2021 DOI: 10.21769/BioProtoc.1 Views: 676

Protocol Collections
Comprehensive collections of detailed, peer-reviewed protocols focusing on specific topics


Abstract
Many organisms alternate the expression of genes from large gene sets or gene families to adapt to environmental cues or immune pressure. The single-celled protozoan pathogen Trypanosoma brucei spp. periodically changes its homogeneous surface coat of variant surface glycoproteins (VSGs) to evade host antibodies during infection. This pathogen expresses one out of ~2,500 VSG genes at a time from telomeric expression sites (ESs) and periodically changes their expression by transcriptional switching or recombination. Attempts to track VSG switching have previously relied on genetic modifications of ES sequences with drug-selectable markers or genes encoding fluorescent proteins. However, genetic modifications of the ESs can interfere with the binding of proteins that control VSG transcription and/or recombination, thus affecting VSG expression and switching. Other approaches include Illumina sequencing of the VSG repertoire, which shows VSGs expressed in the population rather than cell switching; the Illumina short reads often limit the distinction of the large set of VSG genes. Here, we describe a methodology to study antigenic switching without modifications of the ES sequences. Our protocol enables the detection of VSG switching at nucleotide resolution using multiplexed clonal cell barcoding to track cells and nanopore sequencing to identify cell-specific VSG expression. We also developed a computational pipeline that takes DNA sequences and outputs VSGs expressed by cell clones. This protocol can be adapted to study clonal cell expression of large gene families in prokaryotes or eukaryotes.
Key features
This protocol enables the analysis of variant surface glycoproteins (VSG) switching in T. brucei without modifying the expression site sequences.
It uses a streamlined computational pipeline that takes fastq DNA sequences and outputs expressed VSG genes by each parasite clone.
The protocol leverages the long reads sequencing capacity of the Oxford nanopore sequencing technology, which enables accurate identification of the expressed VSGs.
The protocol requires approximately eight to nine days to complete.
This protocol is used in: eLife (2023), DOI: 10.7554/eLife.89331.2
Keywords: Oxford nanopore sequencingBackground
Trypanosoma brucei is a single-celled protozoan parasite that causes African trypanosomiasis and evades the host antibody response by changing its surface coat by antigenic variation (Cestari and Stuart, 2018). T. brucei expresses a single variant surface glycoprotein (VSG) gene from one of the 20 telomeric expression sites (ESs) and periodically switches to a different VSG via transcriptional switching between ESs or by VSG gene recombination. T. brucei has an extensive repertoire of over 2,500 VSG genes and pseudogenes located in telomeric and sub-telomeric regions of large chromosomes. VSG genes are also found on dozens of mini chromosomes often used for VSG gene recombination. VSG genes are approximately 2 kb in length with conserved C-terminus sequences. VSG recombination can occur by gene or segmental gene conversion, resulting in new mosaic VSG sequences. The mechanisms controlling VSG monogenic expression and switching likely entail multiple processes, including controlling VSG repression and expression via proteins associated with telomeric ESs. Several proteins associate with the telomeric repeats or ESs to regulate VSG gene expression and/or switching, such as the repressor activator protein 1 (Touray et al., 2023), phosphatidylinositol phosphate 5-phosphatase (PIP5Pase) (Cestari et al., 2019), telomeric repeat-binding factor (Jehi et al., 2014), VSG exclusion protein 2 (Faria et al., 2019), and ES body 1 protein (López-Escobar et al., 2022); for a review on additional proteins controlling VSG expression and switching, see (Cestari and Stuart, 2018).
Approaches used to study VSG switching rely on genetic modifications that disrupt the ES DNA sequences by incorporating drug-selectable markers or fluorescent proteins downstream of the promoter sequence and upstream of the VSG gene (Rudenko, 1998; Ulbert et al., 2002; Aitcheson et al., 2005) or by adding exogenous endonuclease sites resulting in DNA breaks (Boothroyd et al., 2009; Glover et al., 2013). However, the ES modifications might disrupt protein binding sites and thus affect VSG switching rates; as an example, RAP1 binds to 70 bp and telomeric repeats flanking ES VSG genes and represses their transcription, and disruption of its binding dramatically increases VSG switching rates (Touray et al., 2023). In addition, the genetic modifications of ESs are laborious and restrict the use of drug-selectable markers available for other genetic changes, such as gene knockout or expression of mutant variants in the cell. Other studies used Illumina RNA-seq to investigate VSG expression at a population level (Mugnier et al., 2015). Although this approach helps to identify expressed VSG genes, many short reads fail to align uniquely to the genome and unambiguously identify and distinguish VSG genes expressed from the extensive repertoire of VSG genes/pseudogenes. Moreover, it does not identify switching cells but expressed VSG genes in the population.
Hence, we sought to develop an approach to track cell-specific antigenic switching without genetically modifying ES sequences in an adaptable high- or medium-throughput fashion. We devised a method to detect VSG switching at nucleotide resolution using clonal cell barcoding and nanopore sequencing. We combine DNA barcoding to identify parasite cell clones and thus track switching and non-switching cells and a broad-spectrum VSG primer for cDNA synthesis to capture all transcribed VSGs in parasite clones. Barcoded samples are multiplexed, and VSG cDNAs are sequenced using Oxford nanopore sequencing, followed by sequencing data analysis using a streamlined VSG-BarSeq pipeline to identify switchers. We performed VSG-BarSeq after a temporary knockdown of PIP5Pase, an enzyme that regulates VSG switching in T. brucei (Touray et al., 2023). We found that 99% of the clones switched VSG genes, whereas no switching was detected in the control no-knockdown cell line. The long nanopore reads helped to identify complete VSG sequences and thus track modes of switching. We detected VSG switching by transcriptional and recombination mechanisms, indicating the approach's usefulness in studying antigenic variation. This protocol will enable the efficient study of VSG switching without genetic alterations of the ES. The protocol may be easily adapted to other organisms to study antigenic switching (e.g., Plasmodium, Giardia) or clonal expression analysis of large gene families in prokaryotes or eukaryotic cells.
Materials and reagents
Biological materials
1. Serratia marcescens (American Type Culture Collection, catalog number: 13880)
2. C57BL/6J mice (The Jackson Laboratory, catalog number: 000664)
Reagents
1. Citrate phosphate dextrose adenine (CPDA-1) (Sigma, catalog number: C4431)
2. Luria-Bertani (LB) broth (Quality Biological, catalog number: 340004101)
3. Normal saline (0.9% sodium chloride) (Sigma-Aldrich, catalog number: 7647145)
4. Trypan blue (Thermo Fisher, catalog number: 15250061)
5. 0.5% Proparacaine hydrochloride ophthalmic solution (Alcon Laboratories, Inc., catalog number: NDC0998-0016-15)
6. Phosphate-buffered saline (PBS) (Gibco, catalog number: 10010023)
7. Intestinal fatty acid binding protein ELISA kit (MyBioSource, catalog number: MBS035456)
Laboratory supplies
1. Cell pack (Sysmex America, model: DCL 300A)
2. Sterile Acrodisc WBC syringe filter (Cytiva, catalog number: AP-4952)
3. Magnifier lens
4. 1.5 mL Eppendorf tubes (Eppendorf, catalog number: 022363204)
5. 14 mL culture tube (Corning, catalog number: 352057)
6. 1 mL syringe (Thermo Fisher, catalog number: 309625)
7. 0.3 mL insulin syringe (Becton, Dickinson and Co., model: BD Ultra-Fine II)
8. Umbili-cath polyurethane UVC catheter, single lumen, 3.5 French (Utah Medical, catalog number: 4183505)
Equipment
1. Weighing balance (Mettler-Toledo, catalog number: ME104TE)
2. Sysmex XN-1000TM hematology analyzer (Sysmex Corp, IL)
3. Spectrophotometer (Molecular Devices, model: SpectraMax Plus)
Procedure
A. Preparing packed stored RBCs for transfusion
Time duration: 30 min
1. One week before transfusion, anesthetize FVB/NJ adult donor mouse with isoflurane (1.5%–2.5%) in an induction box until the mouse is non-responsive and apply 0.5% proparacaine ophthalmic solution 5 min before whole blood retro-orbital bleeding.
2. Prepare a 1.5 sterile microliter centrifugal tube with a final concentration of 14% (140 μL) of CPDA-1 solution and 860 μL of whole blood collected from each adult mouse to make a combined volume of 1 mL.
3. Standard heparinized or nonheparinized microhematocrit capillary tubes can be used. Hold the animal by the back of the neck and tighten the loose skin of the head with the thumb and middle finger to keep the animal stable. Place the tip of the capillary tube at the medial canthus of the eye under the nictitating membrane.
4. With a gentle thrust and rotation motion past the eyeball, the tube will enter the slightly resistant sinus membrane. The eyeball itself remains uninjured. As soon as the sinus is punctured, blood enters the tubing by capillary action. When the desired amount of blood is collected, withdraw the tube and apply slight pressure to the eye with a clean gauze pad to ensure hemostasis. Take care not to scratch the cornea with the gauze pad.
5. Euthanize the mice in accordance with IACUC and institutional policies.
6. Immediately after collection, leukoreduce the whole blood using a sterile Acrodisc WBC syringe filter. Then, centrifuge the leukoreduced blood at 295× g for 10 min and partially remove the supernatant to obtain a hematocrit of approximately 75%. Transfer the blood to 1.5 mL centrifugal tubes to create multiple aliquots of 500 μL, leaving a small residual air space, and store in the dark at 4 °C until use.
B. Preparing Serratia marcescens
Considering the potential importance of enteric Gammaproteobacteria in NEC pathogenesis, we introduced a well-characterized strain of Serratia marcescens in our mice on postnatal day 7 (P7) to achieve fecal Gammaproteobacteria abundance similar to what is seen in premature infants. Serratia sp. has been previously used as prototypical Gram-negative bacteria in rodent models of NEC based on several characteristics: (a) translational relevance, as they were originally isolated from a premature infant with NEC; (b) non-pathogenicity in mice, as mice colonized with these bacteria in our laboratory have remained asymptomatic for several months with normal body growth and no histological evidence of intestinal inflammation; and (c) natural red pigmentation of Serratia colonies, which facilitates detection in fecal/tissue cultures.
Time duration: 10 min
1. Three days before transfusion, use a sterile pipette tip to scrape approximately 10 μL of an enteric bacterial glycerol stock from a frozen cryovial.
2. Place the sterile pipette tip containing the bacterial aliquot into a 15 mL culture tube containing 10 mL of LB broth. Culture the bacteria overnight (16 h) in an orbital shaker at 37 °C with agitation speed at 150 rpm. A control culture tube with 10 mL of sterile LB broth should also be cultured simultaneously in the orbital shaker to ensure there is no concern for bacterial contamination of the LB broth.
3. Use a spectrophotometer to measure the culture density at 600 nm (OD600nm). Add 1 mL of sterile LB broth into a 1 cm cuvette and measure the OD600nm to serve as the blank. In a separate 1 cm cuvette, add 1 mL of the S. marcescens culture and measure the OD600nm.
Note: The OD600nm value should be 0.6 ± 0.02, corresponding with the exponential bacterial growth phase. If the OD600nm is greater than 0.6, use LB broth to dilute the culture until the diluted culture exhibits the targeted OD600nm value. If the OD600nm is less than 0.6, continue to culture the inoculum until the OD600nm reaches 0.6.
4. Once the S. marcescens culture has achieved the targeted OD600nm, transfer 2 mL of the culture to 2 mL centrifuge tubes and centrifuge at 3,000× g for 10 min. Discard the supernatant.
5. Resuspend the bacterial pellets each in 1 mL sterile PBS for oral gavage to mouse pups.
C. Phlebotomy-induced anemia
We have improved our previously published protocol by retrieving a smaller blood volume (10 μL per gram of body weight) daily rather than 20 μL on alternate days. This change reduced animal stress and anxiety and prevented acute losses of plasma volume while continuing to achieve effective hematocrits of 18%–23%.
Time duration: 10 days
1. On the first day of the experiment, in the animal facility, weigh the P1 mouse pups and randomly assign the animal into one of two experimental groups: anemic or control groups.
a. Anemic pups: Gently hold the mouse pups by grasping the loose skin at the base of the neck and perform facial vein phlebotomy to remove 10 μL of blood per gram of body weight (Figure 1).
Note: Restrain the mouse gently. Figure 1 shows a detailed enlarged representation of the approximate area of the facial vein by measuring the length of the eye below the lateral canthus and the width of the eye caudally.
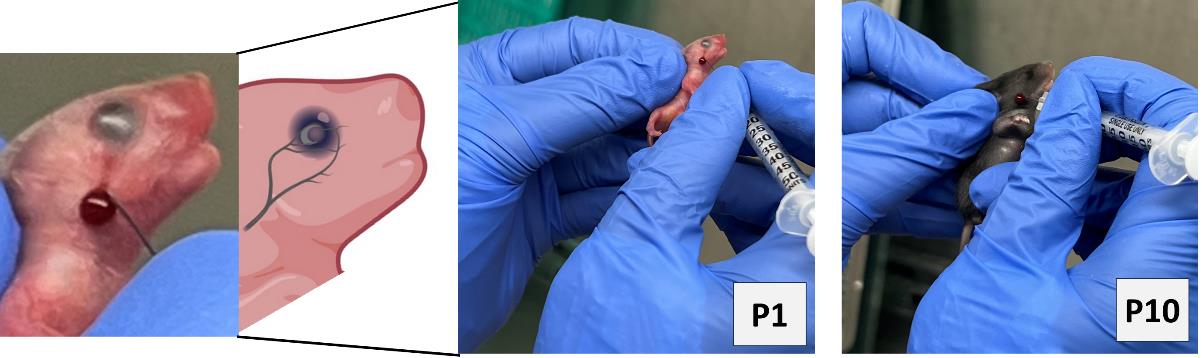
Figure 1.Facial-vein phlebotomy in postnatal day 1 (P1) and P10.
Hematocrit levels will be measured in blood specimens using Sysmex XN-1000TM hematology analyzer according to their standard procedures. To maintain plasma volume, an aliquot of normal saline (0.9% sodium chloride) equal to the amount of blood removed was administered intraperitoneally by carefully inserting a 30 G needle fixed to a 0.5 mL syringe.
b. Control groups: Prick the control pups with a needle through the scruff of the neck while ensuring that they do not bleed in order to subject all mice to similar handling and stress.
Note: The facial vein in murine neonates is well visible during P1–4 days; after P5 fur has developed, which reduces the visibility of the facial vein. Even so, facial vein phlebotomy in P5–10 animals is possible by keeping the mouse pups under warm lights for 5 min to dilate the veins for phlebotomy.
2. Repeat the above steps for both anemic and control group animals every day until P10. In addition to measuring the hematocrit during each phlebotomy, thus confirming the level of anemic condition, visually monitor the anemic mouse pups in the anemic group for the gradual development of pallor. Figure 2 shows the anemic mice visibly pale in the face and toes compared with the control mice following a reduction in hematocrit.
Note: The size and weight of each experimental mouse pup are monitored and recorded during phlebotomy and after RBC transfusion.
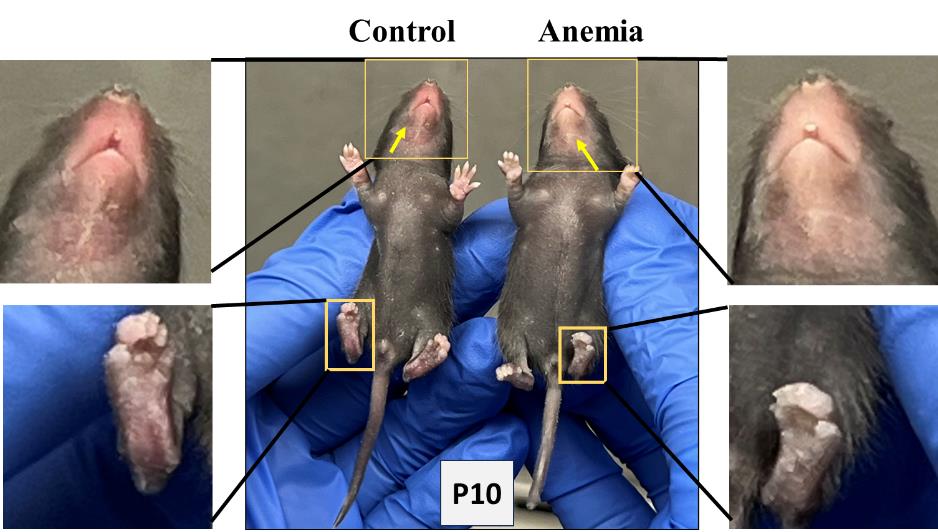
Figure 2.Visible pallor in anemic mice.
3. On P7, administer oral gavage feedings of S. marcescens to the mouse pups of both the control and anemic groups.
a. Fill a 1 mL syringe with S. marcescens culture suspension and attach it to a 3.5 French umbili-cath polyurethane UVC catheter.
b. Gently hold the pup by grasping the loose skin at the base of the neck and use forceps to grasp the distal end of the catheter. Gently introduce 2 cm of the catheter into the oropharynx and esophagus (Figure 3). There should be no significant resistance with the insertion of the catheter.
c. Slowly dispense 50 μL (104 CFU) into the stomach.
d. Slowly withdraw the catheter from the oral cavity.
e. Monitor the animal for increased respiratory effort or emesis associated with a mispositioned catheter.
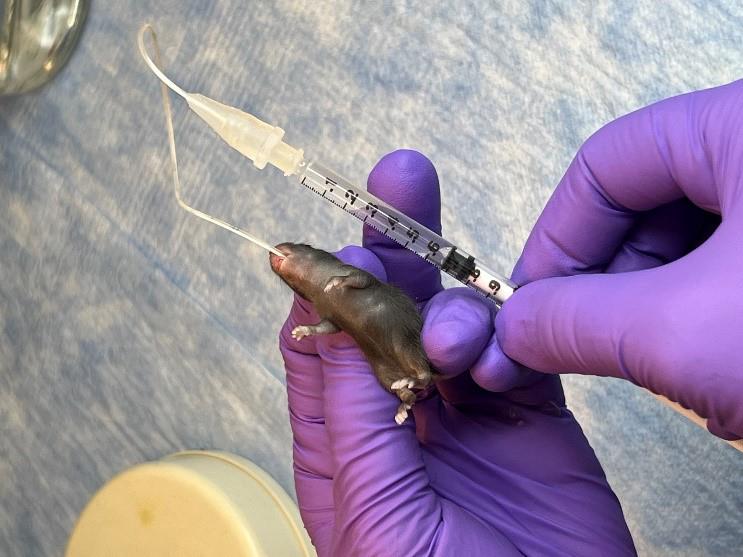
Figure 3.Oral gavage of Serratia marcescens using 3.5 French catheter.
D. Transfusion of stored RBC transfusion by orbital-sinus injection
On P11, randomly assign a few mouse pups from the above anemic and control groups again into two experimental groups: anemia–RBC transfusion and control–RBC transfusion groups. Both group animals are transfused as below:
1. Bring the stored RBCs from the refrigerator and gently resuspend them by rotating tubes in the rotator at room temperature.
2. To administer retro-orbital injections in pups, use a 31 G, 0.3125 in needle attached to a 0.3 mL insulin syringe. Do not inject more than 50 μL of liquid in each orbital sinus. The pups are not anesthetized for this procedure, because they can be adequately manually restrained without being anesthetized.
3. For neonatal mice, right-handed lab personnel will find it easiest to place the pup in left lateral recumbency, with their head facing right, and administer the injection into the right retro-orbital sinus. This procedure can be reversed to accommodate left-handed personnel to inject into the left side of retro-orbital sinus (Figure 4).
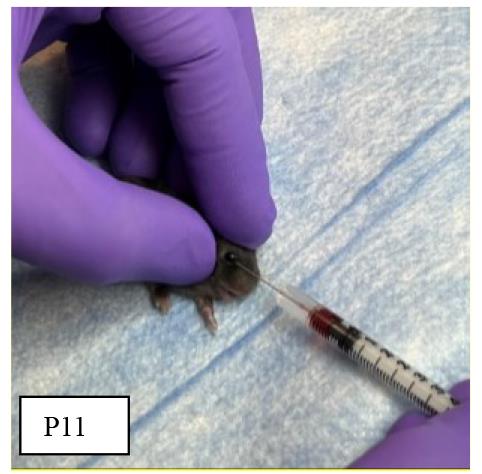
Figure 4.Orbital sinus injection of stored red blood cells (RBCs)
4. To test the efficiency of orbital sinus injection, extra mouse pups may be injected with Trypan blue and monitored for body color change to confirm systemic circulation (Figure 5).
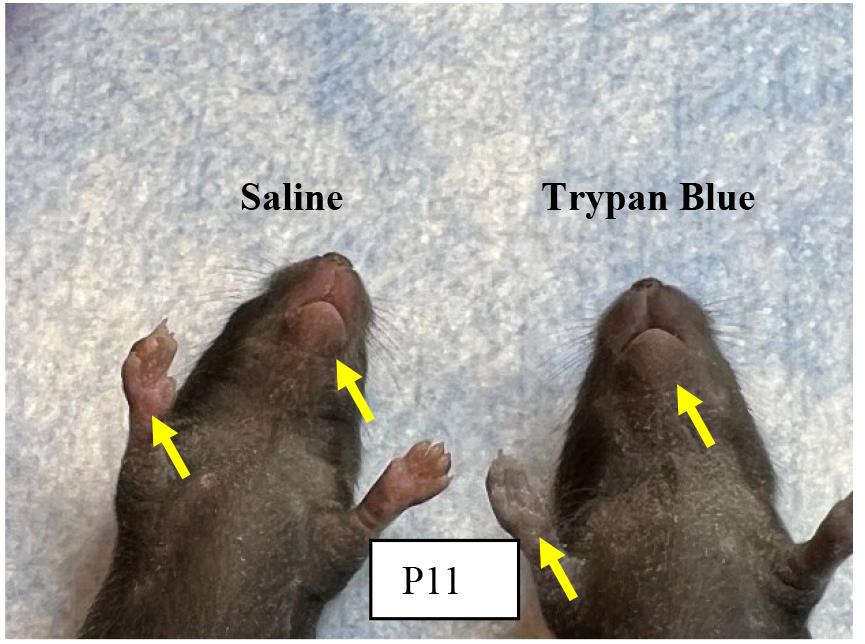
Figure 5.Effectiveness of orbital sinus injection evaluated with Trypan blue.
Note: Tryan blue injection helps to confirm the efficiency of our intravenous injection method via orbital sinus in neonatal mice and it does not vary in either experimental group.
5. Gently restrain the pup’s head with the tip of the thumb and forefinger. Lab personnel must be careful not to place pressure on the trachea or impede venous flow. Nestle the rest of the pup’s body between the thumb and forefinger. In our experience, once the mouse is comfortably restrained, there is minimal struggle, and the mouse does not emit audible vocalizations.
Note: Use sterile saline and a cotton-tipped applicator to gently clean the area above the eye. This helps to remove any skin flakes that may get in the way of the injection and helps to make the skin slightly more transparent.
6. Care must be taken not to overly wet the pup because this could increase the risk of hypothermia. We do not use alcohol or a topical ophthalmic anesthetic. The ophthalmic anesthetic will not penetrate the skin, and we think that alcohol might irritate the pup’s facial skin.
7. Insert the needle, bevel down, at the 3 o’clock position into the eye socket (the area that will become the medial canthus) at an angle of approximately 30°. Mentally visualize the back of the socket and advance the needle to the area of the retro-orbital sinus.
8. Make the injection in a gentle, smooth, fluid motion. If the injection is successful, the lab personnel might observe blanching of the superficial temporal vein, but this does not always occur. Regardless of whether blanching is noted, we have seen the injectate in the target organs.
9. Withdraw the needle slowly, allowing the injectate to redistribute. We sometimes see a small drop of blood at the injection site, which can be gently cleaned with a cotton-tipped applicator.
10. Place the pup in the second prepared nest. When all the pups in a group have received injections, check each one for any additional bleeding and clean the blood, if necessary. Return the pups to their mother in the home cage.
E. Development of NEC after RBC transfusion
1. Check hematocrit values immediately after each phlebotomy and after RBC transfusion. Figure 6 shows a steady reduction from 51% ± 1.54 to 22.5% ± 0.67 from P1 to P11 in anemic mice groups. After RBC transfusion on P11 in a typical experiment, the hematocrit increased to 40.33% ± 1.28 in anemic groups versus 58.67% ± 1.11 in control groups.
2. After the RBC transfusion (on P11), sacrifice pups on P12 according to the institutional ethical guidelines, collecting blood and intestinal tissues for further analyses.
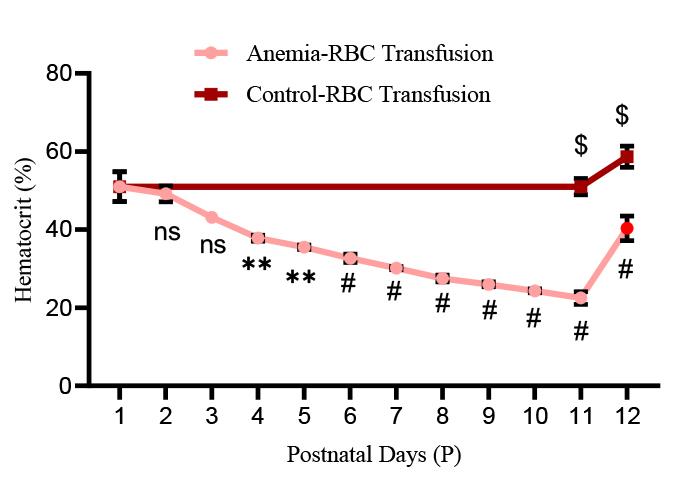
Figure 6.Hematocrit values in experimental groups: Line chart (mean ± SE) demonstrating serial reduction of hematocrit (Hct in %) during the sequence of daily phlebotomy in P1–10 mouse pups and a significant increase in hematocrit after red blood cell (RBC) transfusion in both anemic and control mouse pups. N = 6 mice per group. *p < 0.05; Šídák's multiple comparisons test. **p < 0.01, #p < 0.001 vs. P1 baseline; $p < 0.001 vs. pre-transfused.
3. Intestinal injury is marked by measuring intestinal fatty acid binding protein (i-FABP2) concentrations in the plasma of all four groups using a commercially available ELISA kit per the manufacturer’s protocol. The assay has a linear range of 78–5,000 pg/mL. As depicted in Figure 7, i-FABP2 levels were significantly increased in anemic-transfused groups compared with others.
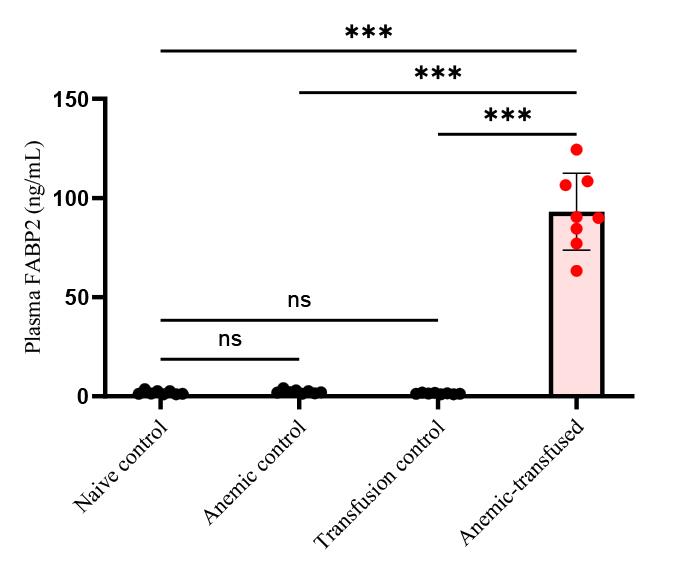
Figure 7.Intestinal injury marker of plasma fatty acid binding protein (FABP2) level in experimental groups. Bar diagram (mean ± SE) summarizes plasma intestinal fatty acid-binding protein 2 (iFABP2) concentrations in naïve control, anemic control, transfusion control, and anemic-transfused mice. N = 8 mice per group. ***p < 0.001; Šídák's multiple comparisons test.
4. Consistent with FABP2 levels, histopathology analyses show that anemic mouse pups that received RBC transfusion developed intestinal injury in the ileocecal region with complete disruption of the crypt-villus axis, severe separation of the lamina propria and transmural necrosis (Figure 8).
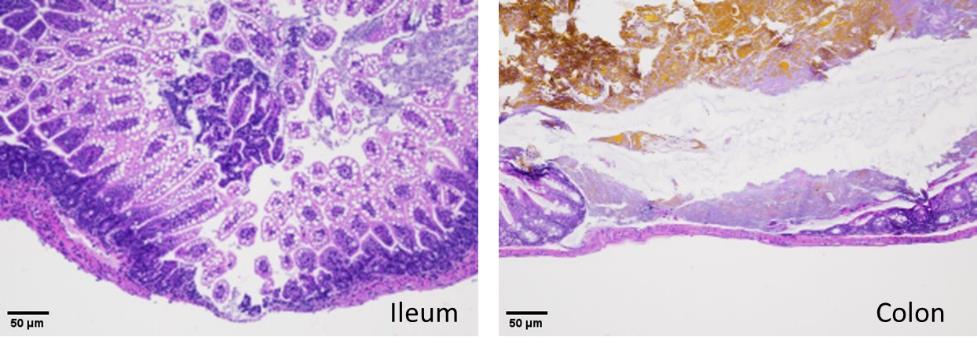
Figure 8.Hematoxylin–eosin staining of the ileum (left) and colon (right) shows necrotizing enterocolitis (NEC) injury in anemic-transfused mice.
Validation of protocol
This protocol or parts of it has been used and validated in the following research article(s):
MohanKumar, K. et al. (2019). A murine neonatal model of necrotizing enterocolitis caused by anemia and red blood cell transfusions. Nature Communication.
General notes and troubleshooting
Troubleshooting
Problem 1
The experimental model solely relies on neonates; therefore, handling plays a crucial role.
Potential solution
Pups need to be held in appropriate positions by giving them maximum comfort. Make sure to reduce the stress while performing phlebotomy to the maximum. Do not disturb the nest while taking the pups away from the cage. Use soft facial tissues to wipe off the blood during phlebotomy. Wait until the dam moves away and gives some space to handle the pups. Making sure to clean the blood from the pups after bleeding improves their survival, because if the dam senses the blood smell, it may ignore the pups while nursing.
Problem 2
Identification of facial veins in neonatal mouse pups for phlebotomy.
Potential solution
The facial vein in murine neonates is well visible during P1–4 days; then, once fur has developed, it reduces the visibility of the facial vein. P5–10 mouse pups are kept in a box under warm lights to dilate the veins, which helps to visualize the dilated “skin dune” for phlebotomy.
Problem 3
Pups develop respiratory distress during oral gavage of S. marcescens using a 3.5 French catheter.
Potential solution
If the catheter is inserted into the trachea, it should be immediately withdrawn and reinserted back slowly. Ensure that there is no significant resistance to the insertion of the catheter.
Problem 4
Administration of stored RBCs may cause circulatory overload.
Potential solution
Acute administration of stored RBCs to neonatal mouse pups may cause circulatory overload, characterized by acute respiratory distress, tachycardia, increased blood pressure, and acute pulmonary edema. To reduce the risk of these iatrogenic conditions, it is important to carefully monitor the neonatal mouse pups after injection and maintain a warm temperature using warm lights. It is also important to train personnel on careful handling and intravenous injection of pups to avoid unintentional death. During the procedure of phlebotomy and/or RBC transfusion, if any of the experimental mouse pups display signs of distress, pain, or discomfort, they should be euthanized and autopsied to determine the cause of death.
Acknowledgments
We acknowledge Sysmex America Inc. for loaning the XN-1000TM hematology analyzer. The authors would like to thank Dr. Matthew Sandbulte, PhD, of the Child Health Research Institute for manuscript review and editing assistance. The research was supported by National Institutes of Health awards HL163043, HL133022, and HD105880 (to M.K.K). This protocol has been used in Nature Communications [24].
Competing interests
We have no competing interests to declare.
Ethic consideration
Institutional permissions: All mice were bred, maintained, and housed in accordance with the procedures outlined in the Guide for the Care and Use of Laboratory Animals under a study proposal approved by the IACUC (#23-004-04 FC). All experiments were performed in accordance with procedures approved by the University of Nebraska Medical Center Institutional Animal Care and Use Committee (IACUC), and the Institutional Biosafety Committee (IBC).
References
- Baer, V. L., Lambert, D. K., Schmutz, N., Henry, E., Stoddard, R. A., Miner, C., Wiedmeier, S. E., Burnett, J., Eggert, L. D. and Christensen, R. D. (2008). Adherence to NICU transfusion guidelines: data from a multihospital healthcare system. J. Perinatol 28(7): 492-497.
- Del Vecchio, A., Motta, M., Radicioni, M. and Christensen, R. D. (2012). A consistent approach to platelet transfusion in the NICU. J. Matern. Fetal. Neonatal. Med 25(Suppl 5): 93–96..
- Holzapfel, L. F., Rysavy, M. A. and Bell, E. F. (2023). Red Blood Cell Transfusion Thresholds for Anemia of Prematurity. Neoreviews .
- Nayeri, F., Nili, F., Ebrahim, B., Olomie Yazdi, Z. and Maliki, Z. (2014). Evaluation of a new restricted transfusion protocol in neonates admitted to the NICU. Med. J. Islam. Repub. Iran 28119.
- Baxi, A. C., Josephson, C. D., Iannucci, G. J. and Mahle, W. T. (2014). Necrotizing enterocolitis in infants with congenital heart disease: the role of red blood cell transfusions. Pediatr. Cardiol 35(6): 1024-1029.
- Elabiad, M. T., Harsono, M., Talati, A. J. and Dhanireddy, R. (2013). Effect of birth weight on the association between necrotising enterocolitis and red blood cell transfusions in<=1500 g infants. BMJ Open 3(11): e003823..
- Josephson, C. D., Wesolowski, A., Bao, G., Sola-Visner, M. C., Dudell, G., Castillejo, M. I., Shaz, B. H., Easley, K. A., Hillyer, C. D. and Maheshwari, A. (2010). Do red cell transfusions increase the risk of necrotizing enterocolitis in premature infants. J. Pediatr 157(6): 972-978e971–973..
- Saroha, V., Josephson, C. D. and Patel, R. M. (2019). Epidemiology of Necrotizing Enterocolitis: New Considerations Regarding the Influence of Red Blood Cell Transfusions and Anemia. Clin. Perinatol 46(1): 101-117.
- Christensen, R. D., Lambert, D. K., Henry, E., Wiedmeier, S. E., Snow, G. L., Baer, V. L., Gerday, E., Ilstrup, S. and Pysher, T. J. (2010). Is"transfusion-associated necrotizing enterocolitis" an authentic pathogenic entity. Transfusion 50(5): 1106-1112.
- Cunningham, K. E., Okolo, F. C., Baker, R., Mollen, K. P. and Good, M. (2017). Red blood cell transfusion in premature infants leads to worse necrotizing enterocolitis outcomes. J. Surg. Res 213158-165.
- Killion, E., (2021). Feeding Practices and Effects on Transfusion-Associated Necrotizing Enterocolitis in Premature Neonates. Adv. Neonatal. Care 21(5): 356-364.
- Marin, T. and Strickland, O. L. (2013). Transfusion-related necrotizing enterocolitis: a conceptual framework. Adv. Neonatal. Care 13(3): 166-174.
- Nair, J. and Lakshminrusimha, S. (2019). Anemia, transfusion, feeding, and racial factors in the pathogenesis of transfusion-associated necrotizing enterocolitis. J. Perinatol 39(7): 1016-1017.
- Rai, S. E., Sidhu, A. K. and Krishnan, R. J. (2018). Transfusion-associated necrotizing enterocolitis re-evaluated: a systematic review and meta-analysis. J. Perinat. Med 46(6): 665-676.
- Rose, A. T., Saroha, V. and Patel, R. M. (2020). Transfusion-related Gut Injury and Necrotizing Enterocolitis. Clin. Perinatol 47(2): 399-412.
- Cibulskis, C. C., Maheshwari, A., Rao, R. and Mathur, A. M. (2021). Anemia of prematurity: how low is too low. J. Perinatol 41(6): 1244-1257.
- Rosebraugh, M. R., Widness, J. A., Nalbant, D. and Veng-Pedersen, P. (2013). A mathematical modeling approach to quantify the role of phlebotomy losses and need for transfusions in neonatal anemia. Transfusion 53(6): 1353-1360.
- Maheshwari, A., Patel, R. M. and Christensen, R. D. (2018). Anemia, red blood cell transfusions, and necrotizing enterocolitis. Semin. Pediatr. Surg 27(1): 47-51.
- Aggarwal, V., Maheshwari, A., Rath, B., Kumar, P. and Basu, S. (2011). Refractory pancytopenia and megaloblastic anemia due to falciparum malaria. J. Trop. Pediatr 57(4): 283-285.
- Whyte, R. K., Jefferies, A. L., F., Canadian Paediatric Society and Newborn, C. (2014). Red blood cell transfusion in newborn infants. J. Paediatr. Child Health 19(4): 213-222.
- Bazacliu, C. and Neu, J. (2019). Necrotizing Enterocolitis: Long Term Complications. Curr. Pediatr. Rev 15(2): 115-124.
- Bazacliu, C. and Neu, J. (2019). Pathophysiology of Necrotizing Enterocolitis: An Update. Curr. Pediatr. Rev 15(2): 68-87.
- MohanKumar, K., Namachivayam, K., Sivakumar, N., Alves, N. G., Sidhaye, V., Das, J. K., Chung, Y., Breslin, J. W. and Maheshwari, A. (2020). Severe neonatal anemia increases intestinal permeability by disrupting epithelial adherens junctions. Am. J. Physiol. Gastrointest Liver Physiol 318(4): G705-G716..
- MohanKumar, K., Namachivayam, K., Song, T., Jake Cha, B., Slate, A., Hendrickson, J. E., Pan, H., Wickline, S. A., Oh, J. Y. and Patel, R. P. (2019). A murine neonatal model of necrotizing enterocolitis caused by anemia and red blood cell transfusions. Nat. Commun 10(1): 3494.
Article Information
Publication history
Accepted: Nov 23, 2020
Published: Dec 20, 2021
Copyright
© 2021 The Authors; exclusive licensee Bio-protocol LLC.
How to cite
海波 单, Jianguo Ruan (2021). test. Bio-protocol 11(18): e1. DOI: 10.21769/BioProtoc.1.
Category
Systems Biology > Microbiomics
Do you have any questions about this protocol?
Post your question to gather feedback from the community. We will also invite the authors of this article to respond.
![]() Tips for asking effective questions
Tips for asking effective questions
+ Description
Write a detailed description. Include all information that will help others answer your question including experimental processes, conditions, and relevant images.